Chess, from the board up.
How the pieces move, how a game ends, and how to read the moves in your books, on the green and white board on your table.
╌╌╌╌
For Yonah, for later.
Chess is played on sixty-four squares by two armies of sixteen. That's most of what there is to remember. The rest is six ways of moving, three special moves and a handful of ways for a game to end. You could fit the rules on a postcard. People have been finding new things inside them for five hundred years, which is about how long the game has had its modern form.
This page is a primer: everything you need to sit down at your board, set it up the right way round, play a whole game by the rules, and write that game down the way your books do. It's one long page so you can keep it open beside the board and jump to what you need mid-game. Every heading is a link.
Your board is a good one to learn on. It's the standard roll-up tournament board, green and cream vinyl, with letters along two sides and numbers along the other two. Those letters and numbers aren't decoration. They give every square a name, and once squares have names, every move can be written down. That's how your books can show you a game played in Paris in 1858, and how you'll write down your own.
Here's what we'll cover:
- The board↓ — sixty-four squares, each with a name.
- Setting up↓ — where the thirty-two pieces go, and two rules of thumb that make it hard to get wrong.
- How the pieces move↓ — six pieces, each one a pattern of steps on the grid.
- Three special moves↓ — castling, en passant and promotion.
- Check, and how games end↓ — checkmate, stalemate, the draws, and the mates worth knowing.
- Writing it down↓ — algebraic notation, the language of your books.
- A game to watch↓ — the Opera Game, move by move.
- Playing well from move one↓ — three opening principles.
- At a tournament board↓ — touch-move, the clock and the scoresheet.
- In one breath↓ — the whole page as something you can say.
Every board here is drawn in your board's colours. On top of them, blue marks where a piece can go, yellow marks the move just played, and orange marks a square that is attacked or off limits. The rules come from the FIDE Laws of Chess, the rulebook every tournament uses; where it matters, the article number is given so you can look it up.
╌╌╌╌
The board
The board is a grid of eight by eight squares, alternately light and dark. Books always say "light" and "dark"; on your board that means cream and green. The colours have no effect on the rules. They're there so your eye can follow lines across the board, and, as we'll see, they explain some of the pieces' habits.
The columns are called files1. There are eight, lettered a to h from White's left to White's right. The rows are called ranks2. There are eight of those too, numbered 1 to 8 starting from White's side. So the letters along the bottom of your board name the files, and the numbers up the side name the ranks.
A square's name is its file and then its rank: letter first, number second, letter in lower case. The square where the e-file crosses the fourth rank is e4. White's bottom-left corner is a1, and the far corner on the other side is h8.
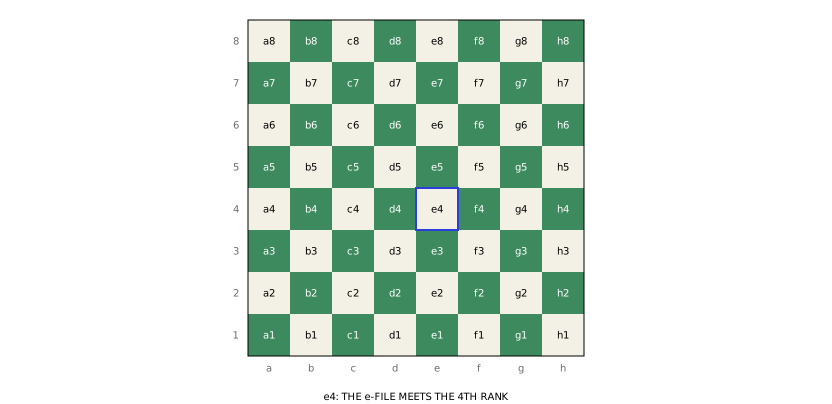
That's the whole system, and it's worth getting comfortable with it, because everything else on this page leans on it. A line of squares running away from you is a file; a line running across is a rank. Squares that touch corner to corner make a diagonal3, named by its two end squares. The two longest are a1–h8 and h1–a8, which cross in the middle of the board.
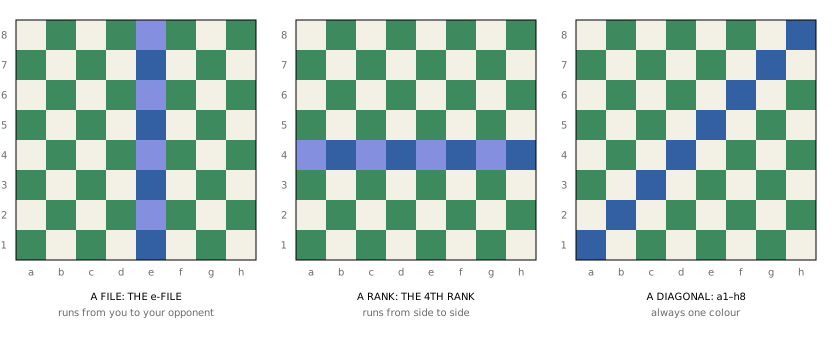
Look at the third board. Every square on a diagonal is the same colour. That's not a coincidence of this diagonal; it's true of all of them, and it's going to matter for the bishops.
Your board's four sides
Your board has letters and numbers on all four sides. The far side and the right-hand side are printed upside down, for whoever sits opposite. When you play White, read the letters along the edge nearest you and the numbers on your left. When you play Black, the upside-down ones are the right way up for you.
The names don't change when you swap sides. e4 is e4 whichever chair you're in. What changes is where it is. From Black's side, a1 is at your far right, the h-file is on your left, and the ranks count down towards you, 8 nearest, 1 furthest. Books almost always print diagrams from White's side, so as Black you're reading the board upside down from how the book shows it. It takes a little practice, and the drill below has a button for it.
Try it
The quickest way to learn the names is to use them. In Find the square, a square is named and you click it. In Name the square, one lights up and you name it with the buttons. When it starts to feel easy, switch to Black's side, then turn the letters off. Being able to see e4 on a blank board is most of what reading chess books needs.
Setting up
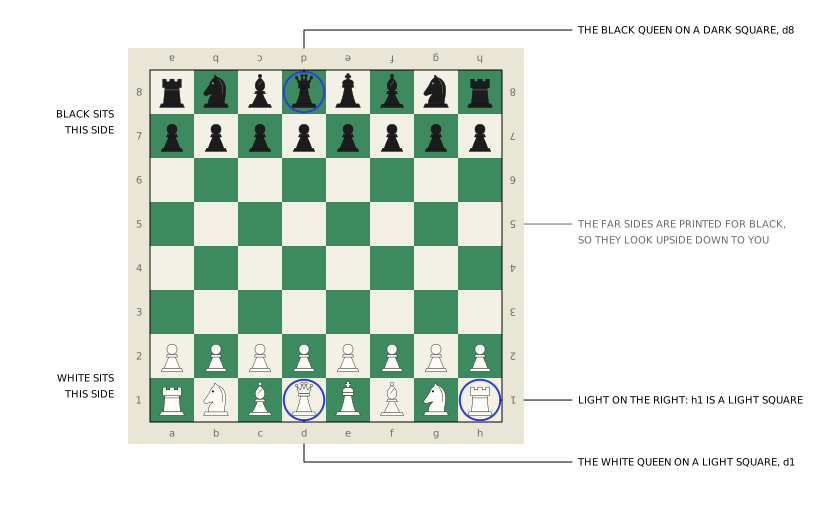
First, turn the board the right way round. The rule is light on the right: the corner square nearest your right hand must be light (FIDE Laws, 2.1). That's h1 for White and a8 for Black, both cream. If the corner by your right hand is green, the board is a quarter-turn wrong. On a roll-up board you can also check that the letters a–h are along your edge and the right way up.
White's sixteen pieces go on the first two ranks, Black's on the last two. The eight pawns stand in a row in front: White's on the second rank, Black's on the seventh. Behind them, on each side's back rank4, from the a-file to the h-file:
rook · knight · bishop · queen · king · bishop · knight · rook
The rooks go in the corners, the knights next to them and the bishops next to those. That leaves two squares in the middle for the king and queen, and the second rule of thumb settles which is which: the queen goes on her own colour. The white queen on d1, a light square; the black queen on d8, a dark one. The kings go on the e-file beside them, facing each other down the board, and the queens face each other on the d-file.
In your set the king is the tallest piece, with a cross on top. The queen is nearly as tall, with a coronet of points. The bishop wears a mitre with a slit in it, the knight is a horse's head, the rook is a little castle tower, and the pawns are the small ones with a ball on top. Your set also came with a spare queen in each colour. You'll find out why in promotion.
White always moves first. After that the players take turns, one move each, and you can't pass: if it's your turn, you must move. A game is usually thought of in three phases: the opening, when both sides bring their pieces out; the middlegame, when they fight; and the endgame, when most of the pieces are gone and the kings come out to play.
Two words are worth having now. Chess players use pieces loosely for everything on the board, but strictly the pawns aren't pieces; the other eight are. Bishops and knights are the minor pieces5, and rooks and queens are the major pieces6.
How the pieces move
A move takes one piece from one square to another. Because every square has a letter and a number, you can describe any move by how much those change: how many files the piece moves across, and how many ranks it moves up or down. That pair of changes is the move's step, and each kind of piece is allowed its own steps and no others.
A move's step is the change in its file and the change in its rank.
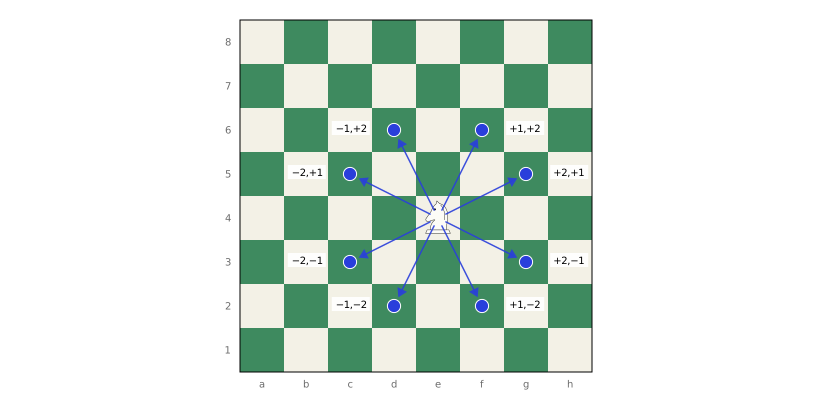
So a pawn going from e2 to e4 makes the step (0, +2): no change of file, two ranks up. A knight going from g1 to f3 makes (−1, +2): one file left, two ranks up. Here are all six pieces in that language, with how many squares each can reach on an empty board from the middle (d4) and from a corner:
| Piece | Its steps | How far | From d4 | From a corner |
|---|---|---|---|---|
| King | Δf and Δr each −1, 0 or +1 | one step | 8 | 3 |
| Rook | (n, 0) or (0, n) | any distance | 14 | 14 |
| Bishop | (n, n) or (n, −n) | any distance | 13 | 7 |
| Queen | a rook's or a bishop's | any distance | 27 | 21 |
| Knight | (±1, ±2) or (±2, ±1) | jumps | 8 | 2 |
| Pawn | (0, +1); (0, +2) from its start | forward only | — | — |
Here n is any whole number other than zero, positive or negative. "Any distance" means the piece slides along its line as far as it likes, but it can't pass through anything. Only the knight jumps.
When a piece's line runs into another piece, what happens depends on whose it is. Your own piece blocks the line: you stop short of it. An enemy piece can be captured7: you move onto its square and take it off the board, and your piece stops there. Every piece captures the same way it moves, except the pawn. Nothing is ever captured by jumping over it, and you can never capture your own pieces. Kings are never captured at all; the next-but-one section explains why.
The rook, the bishop and the queen
These three are the long-range pieces, and they're the same idea three ways.
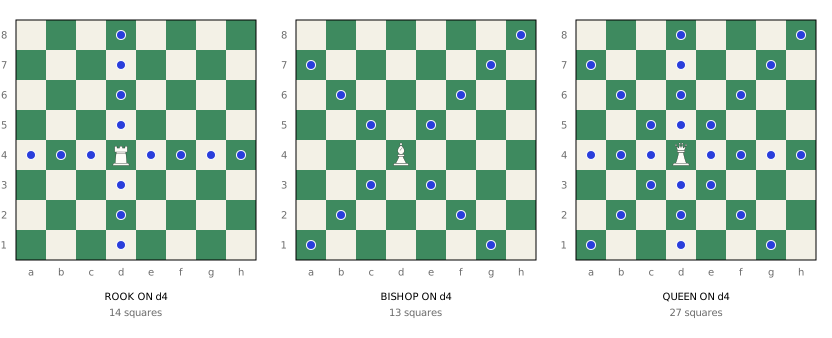
The rook moves along its file or its rank, any distance. In steps, only one of the two numbers changes: only the letter, or only the number. From any square on an empty board it reaches exactly 14: seven along its file and seven along its rank.
The bishop moves along diagonals, any distance. In steps, the file and the rank change by the same amount, so the letter and the number move together. And because every diagonal is one colour, a bishop spends the whole game on the colour it started on. That's why each side has two: White's c1 bishop works the dark squares, and the f1 bishop the light ones. Players call them the dark-squared and light-squared bishops.
The queen is a rook and a bishop at once: any distance along a file, a rank or a diagonal. From d4 she reaches 27 squares, nearly half the board, which makes her by far the strongest piece.
The king and the knight
The king moves one square in any direction, so each coordinate changes by at most one. That's 8 squares from the middle and only 3 from a corner. It's a slow piece and the most important one: the whole game is about trapping the enemy king. A king may never move to a square where it could be captured, and so the two kings can never stand next to each other.
The knight is the odd one. It moves two squares one way and one square the other: two up and one across, or one up and two across, in any of the eight combinations. People usually describe it as an L shape. It's the only piece that jumps. Anything in between, of either colour, doesn't matter. It only needs its landing square to be empty, or to hold an enemy piece to capture.
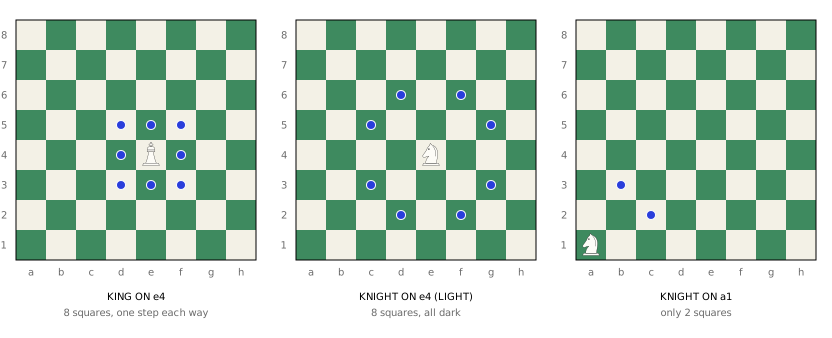
The middle board shows the knight's most useful habit. It started on a light square, and every square it can reach is dark. A knight always changes colour when it moves. The numbered board makes it easy to see why:
- colour of a square ↔ is f + r even or odd?Count the files as numbers (a = 1 … h = 8). a1 is 1 + 1 = 2, even, and dark. Each step right or up flips the colour and changes the sum by one. So the even squares are dark and the odd ones light: h1 is 8 + 1 = 9, odd, light.
- knight: Δf + Δr = ±1 ± 2A knight's step changes the sum f + r by 1 + 2 = 3, or 1 − 2 = −1, or −1 + 2 = 1, or −3. Always an odd number.
- even + odd = odd, odd + odd = evenAdding an odd number always flips even to odd and back.
- every knight move changes colourThe same sum shows why a bishop never does: its step (n, ±n) changes f + r by 2n or 0, which is always even.
This is more useful than it looks. A knight on a light square can only ever attack pieces on dark squares, and the other way round. And if you want to know whether a knight can reach a square in one move, check the colour first: if the square is the same colour as the knight's, it can't.
A knight in the corner reaches only 2 squares, against 8 in the middle. There's an old saying for it, "a knight on the rim is dim", and it's one of the reasons you'll want to bring your knights towards the centre.
The pawn
The pawn is the humblest piece and has the most rules.
A pawn moves straight forward, one square at a time: (0, +1) for White, (0, −1) for Black. It never moves backwards or sideways. On its very first move, from its starting square, it may move two squares instead, (0, +2), as long as both squares are empty.
A pawn can only move forward onto an empty square. If anything stands directly in front of it, friend or enemy, it's stuck. It captures differently: one square diagonally forward, (±1, +1) for White. So a pawn can never capture the piece directly in front of it, only the ones on the two squares diagonally ahead.
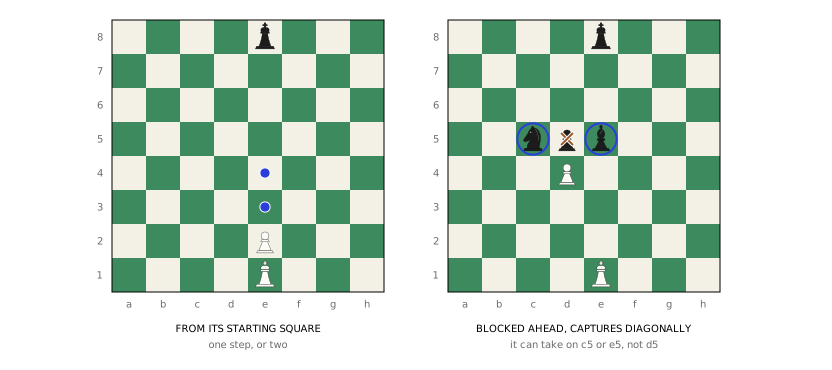
Pawns have two more tricks, en passant and promotion, and both are in the next section.
Try them
Pick a piece and click any square to put it there. The blue dots are where it can go; a blue ring is a capture. Switch to the crowded board to see lines being blocked: the white pieces are yours and block you, the black ones can be taken.
What they're worth
Not all pieces are equal, and you'll constantly be deciding whether a trade is a good one. Players use a rough scale, counted in pawns, to add up their material8:
| Piece | Worth about | Why, roughly |
|---|---|---|
| Pawn | 1 | The unit. |
| Knight | 3 | Short range, but it jumps and forks. |
| Bishop | 3 | Long range, one colour only. |
| Rook | 5 | Reaches 14 squares from anywhere. |
| Queen | 9 | A rook and a bishop together. |
| King | — | Beyond price: lose it and you lose the game. |
These are a convention, not a rule; the right number depends on the position. But they're a good guide. Giving up a knight (3) to take a rook (5) wins "the exchange" and is usually good; giving up a rook for a knight is usually not. Keep a running tally in your head as you play.
Three special moves
Three moves don't fit the simple patterns. Each has conditions, and between them they cover most of the rules beginners get wrong.
Castling
Castling9 is the only move in which two pieces move at once, and the only time the king moves two squares. The king steps two squares towards one of its rooks, and that rook hops over to the square the king just crossed. It counts as a single move of the king (FIDE Laws, 3.8.2).
There are two ways. Kingside, towards the h-file rook: the king goes e1 to g1, the rook h1 to f1. Queenside, towards the a-file rook: the king goes e1 to c1, the rook a1 to d1. Black castles the same way along the eighth rank.
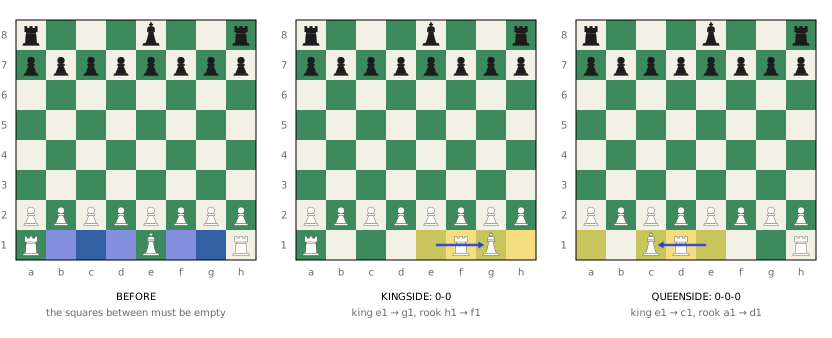
Castling does two jobs in one move. It tucks the king away from the middle of the board, where the fighting is, and it brings a rook from the corner towards the centre, where it's useful. In most games both sides castle early.
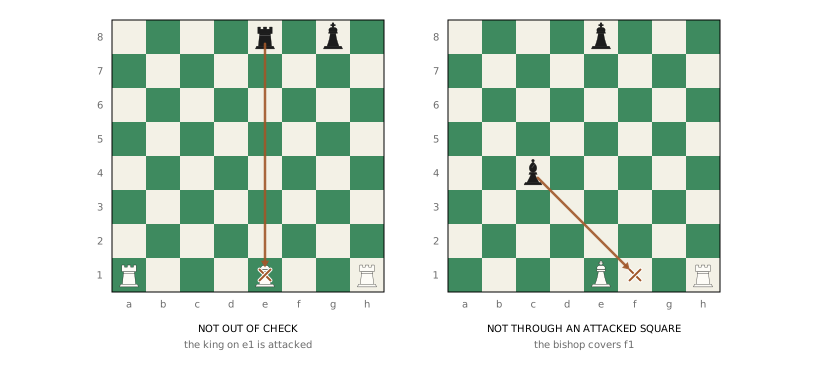
You may castle only if all of these are true:
- The king has never moved, not even to step out and back. Once it has moved, castling is gone for the rest of the game, on both sides.
- That rook has never moved. If only the h1 rook has moved, you can still castle queenside.
- The squares between them are empty. Kingside that's f1 and g1; queenside it's b1, c1 and d1.
- The king is not in check right now.
- The king doesn't pass through or land on an attacked square. Kingside, f1 and g1 must not be attacked; queenside, d1 and c1.
The last two only stop you for now; once the check or the attack is gone, you can castle again. And notice what isn't on the list: the rook may be attacked, and on the queenside the rook may cross an attacked square (b1). Only the king's own path matters.
En passant
The pawn's two-square first move was added to the game to speed it up. It created a loophole: a pawn could use it to slip past an enemy pawn that would have captured it had it moved one square. En passant10, French for "in passing", closes the loophole.
The rule: when a pawn moves two squares from its starting square and lands right beside an enemy pawn, on the same rank and the next file, that enemy pawn may capture it as if it had moved only one square. The capturing pawn moves diagonally to the square the other pawn skipped over, and the skipped pawn is removed (FIDE Laws, 3.7.3).
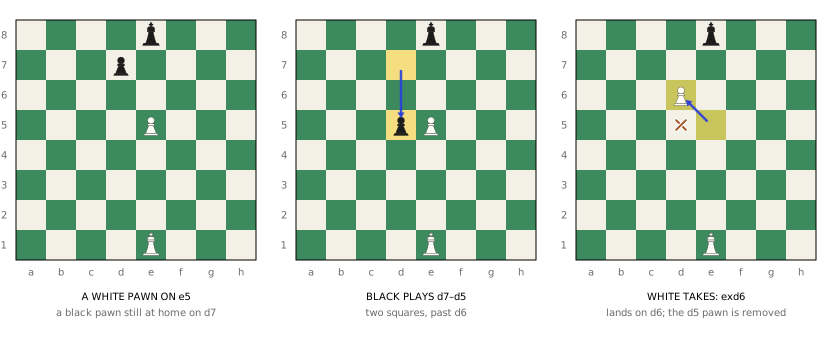
Two things to remember. It's only pawns capturing pawns. And it's only allowed on the very next move: if you don't take en passant straight away, the chance is gone for good. In practice it only comes up when your pawn has reached the fifth rank (the fourth, for Black), because that's the only place an enemy pawn's double step can land beside it.
Promotion
A pawn that walks all the way to the far side, the eighth rank for White or the first for Black, doesn't stay a pawn. As part of the same move, it must be exchanged for a queen, rook, bishop or knight of its own colour, on the square it arrived at. This is promotion11 (FIDE Laws, 3.7.3).
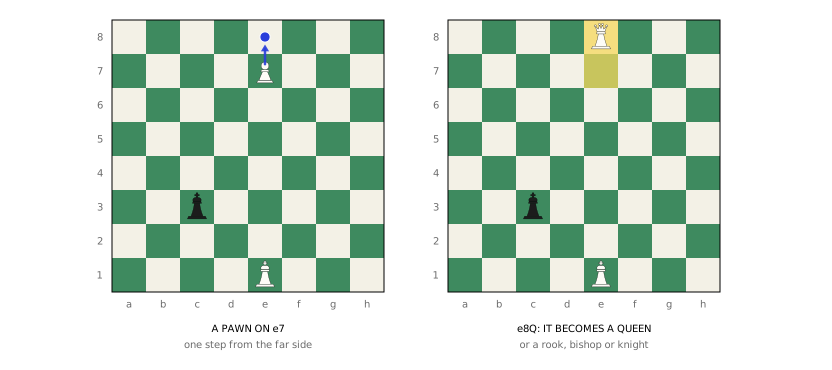
Your choice isn't limited to pieces you've lost. You can have two queens, or three. That's what the spare queens in your set are for. You'll almost always choose a queen, which is why promoting is often called queening. Very occasionally a knight is better, because it can give a check a queen can't, or because a queen would give stalemate. Choosing anything but a queen is called underpromotion12.
Promotion is why pawns matter so much in the endgame. A pawn that no enemy pawn can stop on its way to the far side is a passed pawn13, and it can turn a level game into a won one.
Check, and how games end
The object of the game isn't to capture the most pieces. It's to trap the enemy king.
Check
A king that is attacked, one that could be captured if it were the other side's move, is in check14. The player whose king is in check must get it out of check on their very next move. More generally, you may never make a move that leaves your own king in check. That includes moving it onto an attacked square, and moving a piece that was standing between your king and an attacker.
That last kind of piece is said to be pinned15: it can't move because it's shielding its king. A piece shielding something less important than the king, the queen say, is pinned too, but it's allowed to move if you're willing to lose what's behind it.
There are only three ways out of check:
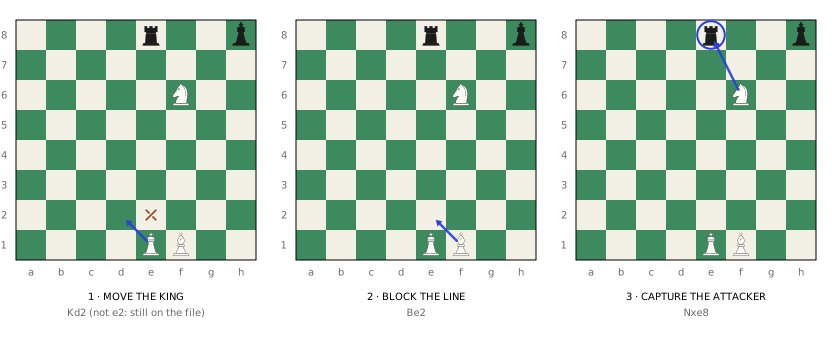
- Move the king to a square that isn't attacked.
- Block the line between the attacker and the king. You can't block a knight's check, because knights jump, and you can't block a check from a piece right next to the king.
- Capture the piece giving check.
Players often say "check" aloud when they give one. It's a friendly habit, not a rule; the FIDE Laws don't require it, and in tournaments you'll mostly hear silence.
Checkmate and stalemate
If the king is in check and none of the three ways out works, it's checkmate16, usually shortened to mate. The game ends at once and the player who gave mate wins (FIDE Laws, 5.1.1). The king is never actually taken off the board; trapping it is enough.
The opposite case catches out every beginner. If the player to move is not in check, but has no legal move at all, with every king move walking into an attack and every other piece blocked or pinned, the game is a draw. That's stalemate17 (5.2.1). It most often happens when one side is far ahead and corners the enemy king carelessly. The two positions below differ by one square.
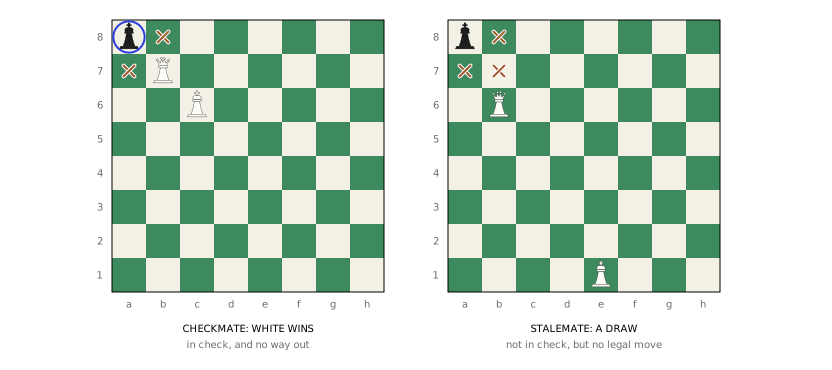
When you're winning, before every move, look at the enemy king and ask: will it have a move after this? If the answer is no and you haven't given check, you're about to throw the win away.
All the ways a game can end
| How | Result | FIDE |
|---|---|---|
| Checkmate | win | 5.1.1 |
| A player resigns | win | 5.1.2 |
| A player runs out of time | win, or a draw if the other side couldn't possibly mate | 6.9 |
| Stalemate | draw | 5.2.1 |
| Dead position: no series of legal moves could mate | draw | 5.2.2 |
| Both players agree | draw | 5.2.3, 9.1 |
| The same position for the third time, if claimed | draw | 9.2 |
| Fifty moves each with no capture or pawn move, if claimed | draw | 9.3 |
| The same position for the fifth time, or seventy-five moves each | draw, automatically | 9.6 |
Most of these are rare at first. Resignation isn't: good players resign as soon as the result is clear rather than play on to mate. The dead position18 covers cases like king against king, or king and bishop against king, where mate is impossible. Threefold repetition19 and the fifty-move rule20 stop games going round in circles. Both have to be claimed by the player whose move it is. "The same position" is exact: the same pieces on the same squares, the same player to move, and the same castling and en passant possibilities.
Three mates to know
Some mates happen so often they have names. These three are worth knowing from the start, two so you don't fall for them and one so you can use it.
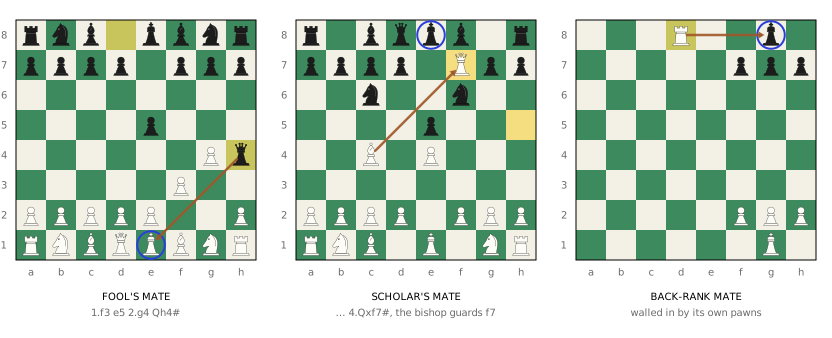
Fool's mate is the fastest possible: 1.f3 e5 2.g4 Qh4#, mate on Black's second move. Nobody plays it on purpose. It's here to show what happens when the pawns in front of the king are pushed for no reason: they open a diagonal straight to it.
Scholar's mate is the one you'll meet. White brings the queen and the light-squared bishop out early, both aimed at f7: 1.e4 e5 2.Bc4 Nc6 3.Qh5 Nf6?? 4.Qxf7#. The square f7 (f2 for White) is the weak point at the start of the game, because only the king defends it. The defence is simple once you see it: after 3.Qh5, guard f7 with 3…Qe7, or block the diagonal with 3…g6, which also attacks the queen. If someone tries this on you and you defend, their queen is out early and exposed, and you're better.
The back-rank mate is the one you'll give. A king that has castled sits behind its three pawns. That's safe, until a rook or queen arrives on the back rank and the king's own pawns stop it from stepping up. The cure is to give your king a breathing hole, called luft21, by moving one of those pawns a square when you have a quiet moment, usually the h-pawn.
The basic finishes
When you've won enough material, you'll still have to deliver mate, and with few pieces left it takes a method. These are the three to learn first. They all work the same way: drive the enemy king to the edge of the board, bring your own king up to help, then mate on the edge.
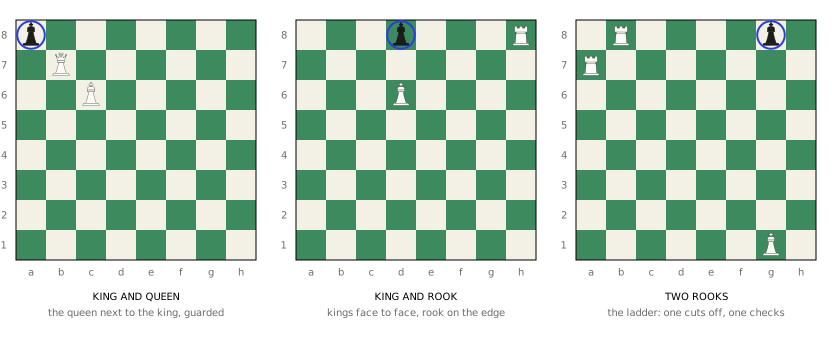
With two rooks you don't even need your king: one rook cuts the king off from a rank while the other checks on the next rank, and they take turns, a rung at a time, until it runs out of board. It's called the ladder. With king and queen, use the queen to shrink the king's box a knight's move away, never giving it zero moves (stalemate again), then bring your king in. King and rook is the slowest and needs your king most, facing the enemy king, with the rook checking along the edge. Your Chandler book, How to Beat Your Dad at Chess, is entirely about mating patterns like these; with this page you can read it.
Writing it down
Every move in your books, and every move you write on a scoresheet, is in algebraic notation22. It's the coordinates from the first section plus a letter for the piece, and once you've learned it you can read a game as easily as a recipe. The full rules are in Appendix C of the FIDE Laws.
A move is a piece and a square
Each piece has a capital letter: K king, Q queen, R rook, B bishop, N knight. The knight is N because K was already taken. Pawns get no letter at all.
A move is the piece's letter followed by the square it goes to. Nf3: a knight moves to f3. Bc4: a bishop moves to c4. e4, with no letter: a pawn moves to e4. You don't say where the piece came from, because usually only one piece of that kind could have got there.
The rest is a handful of signs, coloured here the way the rest of this section colours them:
| Sign | Means | Example |
|---|---|---|
| x | captures | Bxe5: a bishop takes on e5 |
| file + x | a pawn captures: the file it came from, then x | dxe5: the d-pawn takes on e5 |
| + | check | Bb5+ |
| # | checkmate (FIDE also allows ++) | Qxf7# |
| 0-0 | castles kingside | 0-0 (books also print O-O) |
| 0-0-0 | castles queenside | 0-0-0 (or O-O-O) |
| square + Q | a pawn promotes | e8Q (books and software: e8=Q) |
| e.p. | en passant (optional) | exd6 e.p. |
Two of these come in two spellings. FIDE writes castling with zeros, 0-0, and promotion with nothing in between, e8Q (Appendix C). Many books and every chess program use the capital letter O, O-O, and an equals sign, e8=Q. They mean exactly the same; use FIDE's on a scoresheet and don't let the others throw you.
Here's a whole move taken apart. It's from the game further down. Hover over any part:
On move eleven, White's bishop captures on b5, giving check.
When two pieces could go
Sometimes two pieces of the same kind could both reach the square. Then the move adds just enough to say which one moved, a step called disambiguation23. The rule (FIDE Laws, C.10):
- If they're on different files, add the file the piece came from. Knights on b1 and f3 can both reach d2: Nbd2 or Nfd2.
- If they're on the same file, add the rank instead. Rooks on a1 and a5 can both reach a3: R1a3 or R5a3.
- If either would work, the file wins.
Black's reply on move eleven: the knight from the b-file goes to d7.
Reading a game
A game is a numbered list of pairs. The number counts full moves, White's and Black's together:
1. e4 e5 2. Nf3 d6 3. d4 Bg4
When a book breaks off after White's move to comment, it picks Black's move up again with the number and three dots: 3…Bg4. At the end comes the result: 1–0 means White won, 0–1 Black, and ½–½ a draw.
Books also mark moves with their opinion of them. These marks are commentary; you never write them on a scoresheet:
| Mark | Means |
|---|---|
| ! | a good move |
| !! | a brilliant move |
| ? | a mistake |
| ?? | a blunder |
| !? | interesting, worth trying |
| ?! | dubious |
You'll occasionally see the longer form that names both squares, Ng1-f3 or e2-e4, especially in books for beginners; FIDE allows it too. And if you ever open an old English chess book and find moves like P-K4, that's descriptive notation, which counts squares from each player's own side. Both of your books are algebraic, so you can leave it on the shelf.
A game to watch
In 1858 Paul Morphy, a 21-year-old from New Orleans and the strongest player in the world, was invited to a private box at the Paris opera. His hosts were the Duke of Brunswick and Count Isouard, and they asked for a game. They played Black together, consulting on each move, and Morphy played White. The game lasted seventeen moves and has been shown to beginners ever since, because almost everything on this page happens in it.
Step through it with the buttons (or the arrow keys, once you've clicked the board). Each move is taken apart in notation as it's played, and the notes say what's going on. You can also click any move in the list.
Watch what each side does with its moves. Morphy brings out a new piece almost every time: knight, bishop, queen, knight, bishop, then castles. His opponents move pawns and the queen, and at the end their bishop on f8 and rook on h8 have never moved. When the fight starts, Morphy has more pieces in it, and that matters more than how many he has on the board. He gives up a knight, a rook and finally his queen, and mates with the last two pieces he has left.
Playing well from move one
You don't need to memorise openings to start well. Nearly all good opening play follows from three principles, and they're exactly what Morphy did.
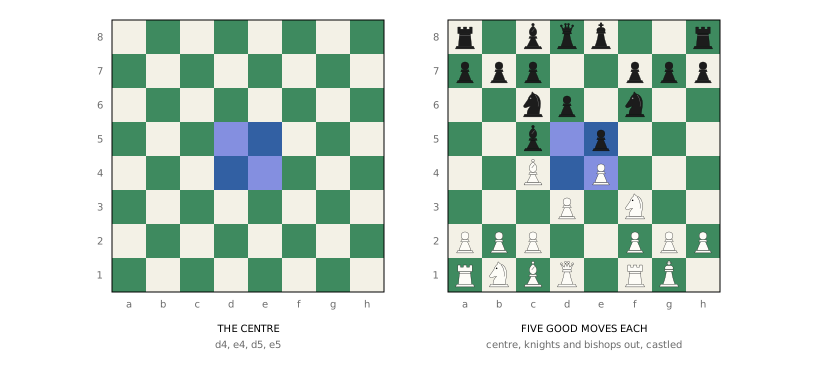
1. Fight for the centre. The four squares in the middle, d4, e4, d5 and e5, are the centre24. Pieces there reach the most squares: a knight on d4 reaches 8, one in the corner 2; a queen 27 against 21. So start by putting a pawn or two in the centre (1.e4 and 1.d4 are the most common first moves) and aim your pieces at it.
2. Develop your pieces. Development25 means getting your knights and bishops off the back rank to squares where they do something. A few habits follow from it. Bring out knights before bishops, since a knight's best square is usually obvious early (f3 and c3 for White). Don't move the same piece twice in the opening without a reason; every move spent on one piece is a move another one stays home. And don't bring your queen out early. She's too valuable to stand where minor pieces can attack her, so the opponent develops while chasing her around, and you lose time running.
3. Get your king safe. Castle early, usually kingside, which needs only the knight and bishop out of the way. A king left in the middle once lines start opening, like the Duke's, can be mated by surprisingly little.
On top of those, one habit will win you more games than any opening: before every move, ask what your opponent's last move threatens. Look at every check, every capture and every attack it makes possible. Then before you play your own move, ask what it leaves undefended. Most games between beginners are decided by a piece left where it can be taken for nothing.
At a tournament board
A roll-up board and a scoresheet mean club and tournament chess, and that adds a few rules about how you physically make a move. They're simple, and everyone in the room will be following them.
Touch-move
Touch-move26 is the one to really absorb. If you deliberately touch one of your pieces on your turn, you must move it, as long as it has a legal move. If you deliberately touch one of your opponent's pieces, you must capture it, if you can (FIDE Laws, 4.3). And once you let go of a piece on a square, that's the move; you can't pick it up again (4.7). So decide first, then touch.
If a piece is sitting crookedly on its square and you want to straighten it, say "j'adoube"27 (French, "I adjust") or simply "I adjust" before touching it. Only do it on your own turn (4.2).
Make every move with one hand (4.1). That includes castling, where the order matters: touch the king first, move it two squares, then move the rook with the same hand. If you touch the rook first you aren't allowed to castle that move; you'll have to move the rook (4.4). When promoting, take the pawn off and put the new piece on, in either order; your choice is fixed once the new piece touches the square (4.4.4, 4.6).
The clock
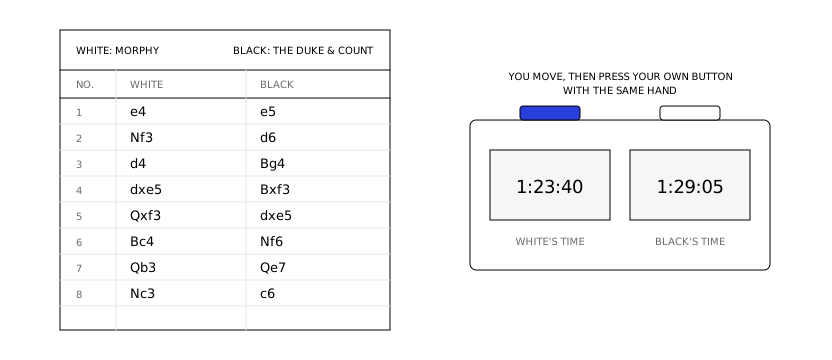
A chess clock is two clocks in one box, and only one runs at a time. When you've made your move, you press the button on your side. That stops your clock and starts your opponent's. Press it with the same hand you moved with, and don't keep your hand hovering over it (6.2.3).
Each player has a fixed amount of time for the game, often with an increment28, a few seconds added to your clock after every move. If your time runs out, you lose, unless your opponent has no way at all to mate you, in which case it's a draw (6.9).
If you make an illegal move and press the clock, the position is put back and your opponent gets two extra minutes. Do it a second time in the same game and you lose (7.5.5). In rapid chess the bonus is one minute instead of two (Appendix A.3). Pressing the clock after moving a pawn to the last rank, but before putting the new piece on, counts as an illegal move, and the pawn becomes a queen whether you wanted one or not (7.5.2).
The scoresheet
In standard games each player writes down every move, both their own and their opponent's, on a scoresheet29, in algebraic notation (8.1.1). This is where your practice with square names pays off. A few rules:
- You may not write your move down before you've played it (8.1.2). Writing it first and then thinking is a well-known way to cheat with notes, so it's banned.
- You may reply to your opponent's move before writing it down, but you must write it down before you make your next move (8.1.3).
- If you have less than five minutes left and no increment of 30 seconds or more, you can stop recording (8.4). In rapid games you don't have to record at all (Appendix A.2).
- If a draw is offered, both players write (=) after the move (8.1.5).
Draws, phones and manners
To offer a draw, make your move on the board, say "I offer a draw", then press your clock: in that order (9.1.2.1). Your opponent accepts by saying so, or declines by saying so or simply by making a move.
Turn your phone off and leave it in your bag, if the event allows that, or at home. Having an electronic device on you in the playing hall can cost you the game, whether or not you use it (11.3.2).
The rest isn't in the rulebook, but everyone does it. Shake hands before the game and after. Don't talk to your opponent during the game, except to offer a draw or to say "j'adoube". When you're lost, resign by saying so and stopping the clocks; you may see people tip their king over, which is the old way of saying the same thing. And afterwards, if your opponent is willing, go through the game together. It's the best lesson there is, and it's free.
In one breath
Here is the whole page as something you can say:
"The board goes light on the right, the queen on her colour. Every square has a name, file then rank, from a1 to h8. The rook slides along files and ranks, the bishop along diagonals and stays on its colour, the queen does both, the king steps one square, the knight jumps two-and-one and always changes colour, and the pawn walks forward and captures diagonally. A king may castle once if it and its rook haven't moved and it isn't passing through check; a pawn can be taken en passant straight after a double step; a pawn that reaches the far side becomes a queen. You win by checkmate, and no legal move when you're not in check is stalemate, a draw. A move is a piece letter and a square, like Nf3, with x for a capture and + for check. Take the centre, develop your pieces, castle, and before every move ask what your opponent is threatening."
Every phrase in that is now something you've seen on the board. The rest of chess is learning what to do with it, and that's the fun part.
From here, play. Play slowly, against people or a computer set to an easy level, and set up your board and replay a game from your books whenever you can. Chandler's How to Beat Your Dad at Chess is a book of mating patterns, and you have the notation to read it now. Stean's Simple Chess is the next step after that: it's about plans rather than tricks, and it uses a few words you'll meet as soon as you open it:
| Word | Means |
|---|---|
| Open file | a file with no pawns on it; a highway for rooks |
| Half-open file | a file with only the opponent's pawns on it |
| Weak square | a square your pawns can no longer guard |
| Outpost | a weak square of the opponent's where your piece can settle, usually a knight |
| Isolated pawn | a pawn with no friendly pawns on the files next to it |
| Passed pawn | a pawn no enemy pawn can stop or capture on its way to promotion |
And when Yonah is old enough to reach the board, set it up with him: light on the right, queen on her colour. You'll know why.
Sources
- FIDE Laws of Chess, in force from 1 January 2023. Every rule on this page, and the article numbers given in brackets. Appendix C is algebraic notation.
- Murray Chandler, How to Beat Your Dad at Chess (Gambit). Your next book: mating patterns.
- Michael Stean, Simple Chess (Dover, algebraic edition). The one after: strategy and plans.
- The moves of the Opera Game (Paris, 1858) are the historical record. The notes on each move are ours, and every move, mate and stalemate on this page was checked with the python-chess library (
data/build_data.py,diagrams/draw.py).
╌╌╌╌
Glossary
1File — A column of eight squares running from White's side to Black's, lettered a to h.
2Rank — A row of eight squares running across the board, numbered 1 to 8 from White's side.
3Diagonal — A line of squares touching corner to corner, named by its end squares (a1–h8). Always one colour.
4Back rank — The rank a player's pieces start on: the first for White, the eighth for Black.
5Minor pieces — Bishops and knights, worth about three pawns each.
6Major pieces — Rooks and queens. Unlike the minor pieces, a rook or queen with its king can mate a lone king.
7Capture — Moving onto a square an enemy piece occupies and removing it from the board. Written x.
8Material — The pieces each side has, counted in pawns: pawn 1, knight 3, bishop 3, rook 5, queen 9. A convention, not a rule.
9Castling — The king moves two squares towards a rook and the rook crosses over it. Only if neither has moved, the squares between are empty, and the king is not in, through or into check. Written 0-0 or 0-0-0.
10En passant — "In passing": capturing a pawn that has just moved two squares as if it had moved one. Pawns only, and only on the very next move.
11Promotion — A pawn reaching the far rank is exchanged, as part of the same move, for a queen, rook, bishop or knight of its colour.
12Underpromotion — Promoting to anything but a queen.
13Passed pawn — A pawn with no enemy pawn ahead of it on its own file or the files either side, so none can stop or capture it.
14Check — A king under attack. It must be dealt with on the next move: move the king, block, or capture the attacker. Written +.
15Pin — A piece that can't move, or can't move safely, because it shields a more valuable piece behind it on the same line.
16Checkmate — Check with no way out. The game ends and the side giving mate wins. Written #.
17Stalemate — The player to move is not in check but has no legal move. A draw.
18Dead position — A position in which neither side can possibly mate, such as king against king. A draw.
19Threefold repetition — The same position, with the same player to move, arising for the third time. A draw if claimed; automatic at the fifth time.
20Fifty-move rule — Fifty moves by each player with no capture and no pawn move. A draw if claimed; automatic at seventy-five.
21Luft — German for "air": a square made for the king, usually by pushing a pawn in front of it, so it can't be mated on the back rank.
22Algebraic notation — Writing moves as a piece letter (K Q R B N, none for a pawn) and the square it goes to. The standard everywhere, and FIDE's required form on a scoresheet.
23Disambiguation — Adding the file (Nbd2) or, if that isn't enough, the rank (R1a3) of the piece that moved, when two of the same kind could reach the square.
24Centre — The squares d4, e4, d5 and e5, where pieces reach the most squares.
25Development — Moving pieces, especially knights and bishops, off the back rank to useful squares in the opening.
26Touch-move — The rule that a piece you deliberately touch must be moved (your own) or captured (your opponent's), if it legally can be.
27J'adoube — "I adjust": said before straightening a piece on its square, so touching it doesn't count as touch-move.
28Increment — Time added to a player's clock after each move they make.
29Scoresheet — The form on which each player records both sides' moves during a game, in algebraic notation.